• Skip to primary navigation
  • Skip to main content
  • Skip to primary sidebar
  • Skip to footer
Menu
Royi Sal Jewelry Designer & Manufacturer
  • HOME
  • ABOUT
    • About Royi Sal
    • Our Story
    • Our Company Timeline
    • Meet the Team
    • Why Choose Royi Sal
    • Royi Sal in the Press
    • Video Gallery
    • Careers (We’re Hiring)
    • Environmental & Ethical
  • SERVICES
        • FOR CLIENTS

        • OEM & ODM (Custom Design service)
        • Designed & Manufactured Jewelry
        • Sustainable Jewelry
        • Packaging Designs
        • MANUFACTURING

        • Professional Metals Casting
        • Stamping Jewelry
        • Metal Polishing & Finishing
        • BENEFITS

        • 0%* Import Taxes
  • COLLECTIONS
    • Available Product Line
    • In-House Designed
    • Online Magazine
    • Catalog
  • CONTACT
  • FAQ
    • Designs
    • Manufacturing
    • Packaging
    • Placing Orders
    • Refunds
    • Returns
    • Sample Order
    • Shipping
  • Book a Meeting
  • en English▼
    X
    zh-CN Chinese (Simplified)en Englishfr Frenchde Germanja Japaneseru Russianes Spanish

Royi Sal Jewelry Designer & Manufacturer

Thailand's Premiere Silver Jewelry Designer & Manufacturer in Bangkok, Thailand. Manufacturing OEM Fine Jewelry for Women & Children at Affordable Prices Since 2001

You are here: Home / DIY / 8 Steps To Make A PMC Ring

8 Steps To Make A PMC Ring

Published on: 18/12/2020 by Royi Sal Jewelry Team - Leave a Comment

8 Steps To Make A PMC Ring

Making PMC rings is not difficult; it takes a bit of practice and the right tools for the job. Learning how to make a PMC ring is an excellent way of improving your metal clay design skills, and concentrating on minor details will really make your PMC rings stand out. Here are the 8 Steps To Make A PMC Ring.

Follow our tips on making metal clay rings and producing a new design that you can adapt and improve as your silver metal clay jewelry skills develop.

How to make a PMC ring step by step

Needed Supplies and Materials:

  • Precious metal clay
  • Kiln or hand torch
  • Badger balm
  • Plastic spacers
  • Plastic roller
  • Textured sheets of your choice
  • Metal clay cutting blades
  • Clay cutters
  • Sanding pads
  • Needle files
  • Brass brush
  • Mandrel
  • Mallet

1. Measure out the size of your PMC ring

Measuring out the size of your PMC ring

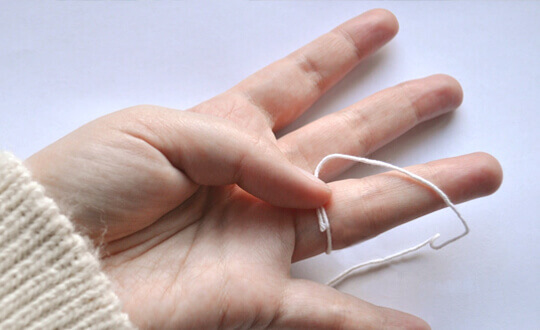
You can do this using a traditional ring sizer, but one simple way of doing this is by cutting out a strip of paper or string and wrapping this around your finger.

You can then mark the string or paper with accurate measurement and unravel this so that it’s easy to continue onto the next stage.

With your string or paper unraveled, mark this out on a separate piece of paper for clarity. Make sure that you add 15% of the initial measurement.

This will make sure that the ring size is correct even after firing as the ring will shrink.

2. Roll out your precious metal clay

Rolling out your precious metal clay

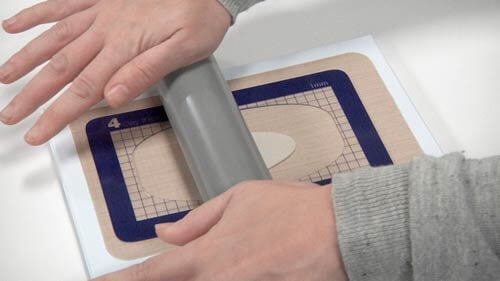
Place your clay onto a clean work surface, preferably a Teflon coated mat or something similar, to prevent the clay from sticking as you work.

You can also add badger balm to the mat and your hands to prevent the clay from sticking further. Place your plastic spacers on either side of your clay to ensure that the clay is even as you roll it out.
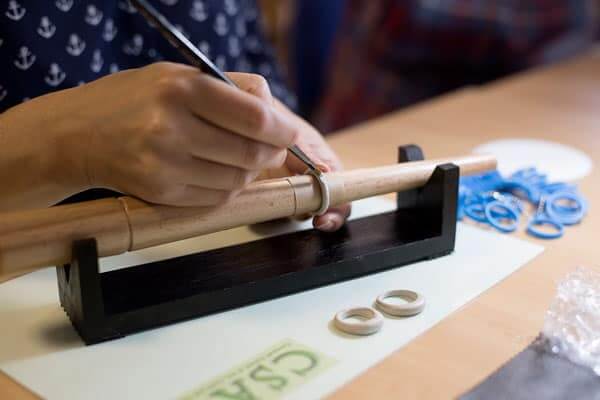
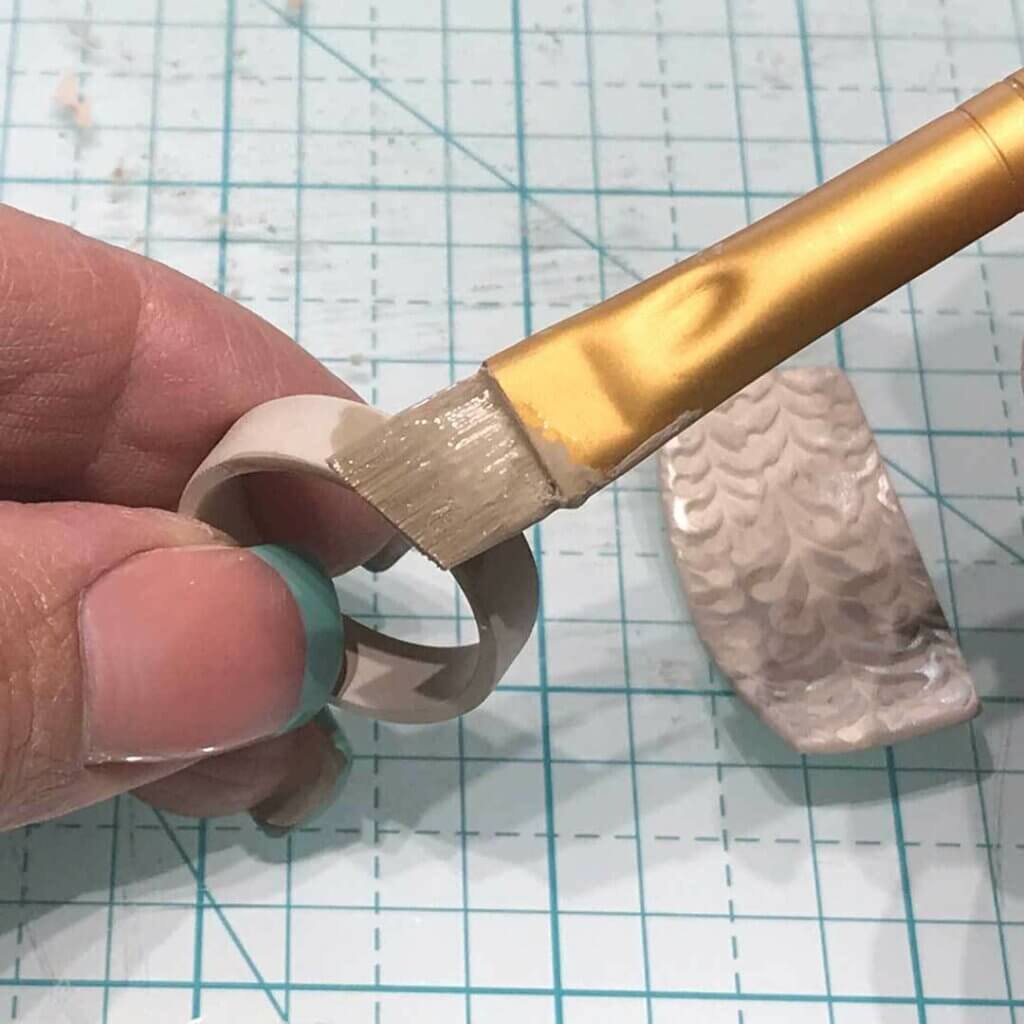
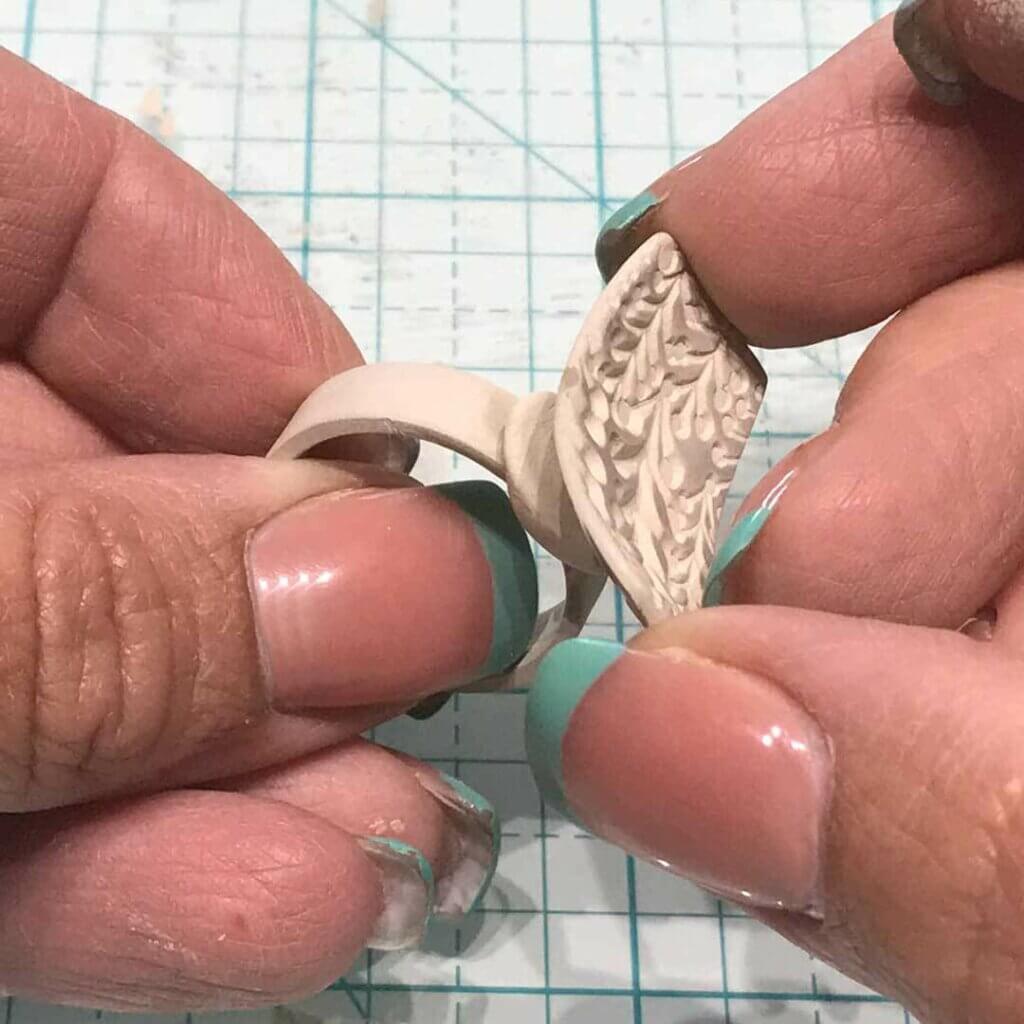
3. Cut the clay

Cutting the clay

Once you’ve added texture to your silver clay ring, you can cut it accurately to size. Use a metal clay cutting blade to cut along the measurement you made earlier.

4. Leave your ring to dry

Leaving your ring to dry

Once you’ve added the detail to your ring with texturing sheets and cutters, make sure you leave it to dry for 24 hours. It’s important to make sure your PMC ring is dehydrated so that it hardens and strengthens before finishing up.

You can leave your ring to dry in its flat, laid out state – forming the ring shape will come after the firing process.

Use sandpaper to remove any burrs and smooth out the edges. You can also neaten any cut-out shapes and awkward areas with a needle file.

5. Now you’re ready for the firing process

firing process

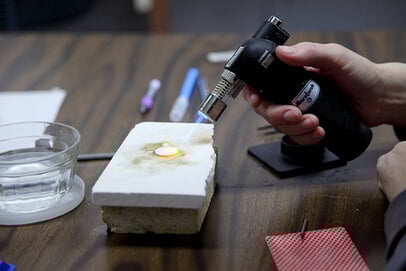
Learn about the firing process in more detail in our post on how to fire precious metal clay. This will advise you on firing with a kiln, with a hand torch, and with a gas hob.

Whichever method you choose, make sure you read the metal clay manufacturer’s instructions for firing times. Once the ring has been fired, leave to cool for as long as needed.

You can quench your PMC ring, but quenching is not recommended if you’ve embedded stones in your design.

6. Brush and polish

Brushing and polishing the ring

Now your design is completely cool, use a brass brush to remove the heat’s tarnishing. This will start to bring out the shine of the metal.

Then continue to polish as required depending on the finish you would like. Start with coarse sanding pads first and work your way through finer pads for a high luster shine.
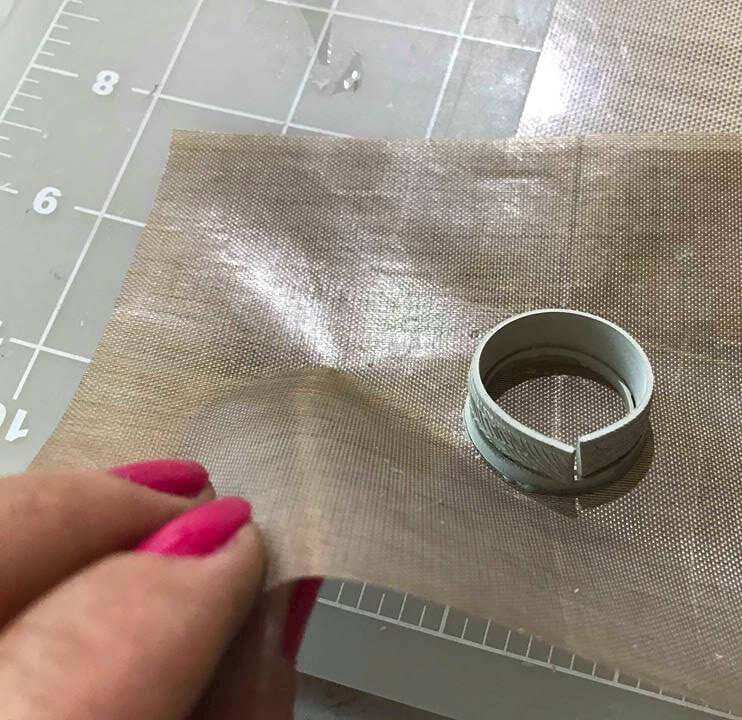
7. Shape your ring

Shaping your ring

Firstly, bend your ring into shape using your fingers and pliers. Using a mandrel and a mallet, start to refine the shape and bring the ring together.

You may need to make several passes with your mallet to create the perfectly rounded ring you’re looking for.

8. Adapt and refine your PMC ring designs

At this stage, you can create an overlapping ring as part of your design – this is the simplest way of starting when learning how to make a PMC ring.

Later you can experiment with fully formed rings before firing or create new designs that suit your jewelry making style. Remember the cutout start shape from earlier?

You can also experiment by adding these cutouts to your design in a raised pattern on your ring. Add with metal clay paste to ensure a sturdy bond that lasts and lasts.

Now you know how to make a PMC ring, nothing stops you from expanding on this initial design idea and creating something special.

Learning how to use metal clay is an excellent way of expanding your jewelry-making skills and giving your customers new collections to choose from. 8 Steps To Make A PMC Ring.

P.S. Royi Sal Jewelry, as a decades-long leader in silver jewelry design and manufacturing, invites you to download our latest magazine here and profit from the exceptional jewelry designs at affordable prices you will find in the magazine. Click here to download it now.

Filed Under: DIY Tagged With: clay for jewellery making, cookson, cooksongold, jewellery, jewellery blog, jewellery clay, jewellery design, jewellery designer, jewellery making, jewellery making blog, jewellery making clay, jewellery making supplies, Jewellery Tips, jewellery tools, metal clay, pmc, pmc 3, pmc aqua, pmc clay, precious metal clay, silver, silver clay

About Royi Sal Jewelry Team

The secret behind the success of Royi Sal Jewelry is not our creative designs or our high-quality fine and affordable jewelry; it’s not even our constant drive for innovation or the exhibitions we attend. The secret of our success is our people.

Previous Post: « 4 Brilliant Digital Marketing Tips for Fashion Jewelry Sellers
Next Post: 6 Jewelry Storage Ideas »

Reader Interactions

Leave a Reply Cancel reply

Your email address will not be published. Required fields are marked *

Primary Sidebar

Banner-wharehouse
Sidebar/Services Form
REQUEST MORE DETAILS

Please fill out the form below and click the button to request more information about

I understand that Royi Sal Jewelry team will use my data to contact me. Read Terms & Conditions
We will never spam or sell your data and you can always unsubscribe with one click.

You Should Read This

Jewelry making. Female hands with a tool on a yellow background.

4 Non-Metal Styles for Your Handmade Jewelry

There are different tools and techniques that can be used with metal in handmade … Read More... about 4 Non-Metal Styles for Your Handmade Jewelry

997_3322_6_12-300×225

3 Important Things on Using a Jeweler’s Saw

Starting out in jewelry making? Need to brush up on your pre-existing knowledge? … Read More... about 3 Important Things on Using a Jeweler’s Saw

IMG_9685

4 Creative Ways in Carving Precious Metal Clay

If you’ve already had an introduction to PMC and covered the basics of working … Read More... about 4 Creative Ways in Carving Precious Metal Clay

The Duke and Duchess of Sussex on their wedding day

The Royal Wedding: Meghan’s Jewelry

We couldn’t let the recent royal wedding go by without taking a closer look at … Read More... about The Royal Wedding: Meghan’s Jewelry

wire wrap

6 Easy Steps To Make Wire Wrapped Earrings

Wire wrapping is a skill that anyone can pick up and master in jewelry making. … Read More... about 6 Easy Steps To Make Wire Wrapped Earrings

hammer

9 Best Jewelry-Making Hammers

The hammer is one of the most fundamental tools in jewelry-making hammers. … Read More... about 9 Best Jewelry-Making Hammers

chains

8 Best Jewelry Chain Styles

There are many gold and silver chain styles available, each serving different … Read More... about 8 Best Jewelry Chain Styles

melting silver

How To Melt Silver To Make Jewellery

Melting silver is a natural process and once you get to know the fundamental … Read More... about How To Melt Silver To Make Jewellery

Ethical Jewelry

Ethical and Sustainable Jewelry as a Trend Challenge and Opportunity

Ethical and Sustainable Jewelry has become a hot topic in the global jewelry … Read More... about Ethical and Sustainable Jewelry as a Trend Challenge and Opportunity

online jewelry

5 Ways to Bring Jewelry Business Online Amidst COVID-19

 With the Covid19 outbreak cutting into many jewelers’ ability to conduct … Read More... about 5 Ways to Bring Jewelry Business Online Amidst COVID-19

Why-Some-Rings-Discolor-your-Finger-HERO

7 Different Types Of Ring Shanks And How To Identify Them

Are you getting to know the anatomy of engagement rings? Recently, we talked … Read More... about 7 Different Types Of Ring Shanks And How To Identify Them

Subscribe to our newsletter to receive new product updates, special offers & jewelry & news.


Your details are safe with us. We will never spam and you can always unsubscribe.

Footer

Royi Sal Co., Ltd.

436, 438 Soi Chokchaijongjumroen (Soi 53), RAMA III rd., Bangpongpang, Yannawa, Bangkok , 10120, Thailand
Phone: +66 (0)2.294.7103
Email: [email protected]
  • Facebook
  • LinkedIn
  • RSS
  • Twitter
  • YouTube
Accept-PayPal-Credit-Cards-Thailand
Payoneer-New-Logo_transparent_v1

Member Of

logofooter1a
Copyright © 2023 Royi Sal Co., Ltd. All Rights Reserved · Sitemaps · Log in